The Essential Guide to Conquering Wall Paint Problems
A fresh coat of paint transforms a room, breathing new life into your living space. But sometimes, what starts as a beautiful finish quickly deteriorates into a frustrating mess. These common wall paint problems aren’t just cosmetic; they often indicate an underlying issue with surface preparation, moisture, or application technique.
Understanding the root cause of these various wall paint problems is the first, crucial step toward a successful repair. Whether you’re a seasoned DIYer or hiring a professional, knowing the terminology and the fixes will save you time, money, and headaches. We’ll dive deep into the five most common wall paint problems homeowners face and provide actionable, step-by-step solutions to restore your walls to their pristine glory.
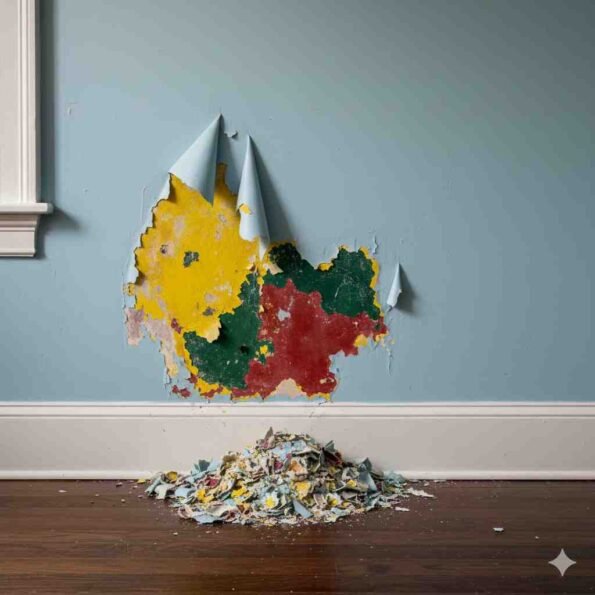
1. Peeling and Flaking: The Root of the Wall Paint Problem
Peeling and flaking paint is arguably the most common and visually distressing of all wall paint problems. It occurs when the paint film loses adhesion to the substrate (the wall material) or the previous paint layer. This manifests as chips, flakes, or large sheets of paint separating from the surface.
Causes of Peeling and Flaking:
- Moisture Intrusion: This is the most frequent culprit. Water vapor getting behind the paint—from leaks, high humidity, or lack of proper ventilation (especially in bathrooms/kitchens)—forces the paint film away from the surface.
- Poor Surface Preparation: Painting over a dirty, greasy, or glossy surface. The new paint can’t “grip” the wall properly.
- Applying New Paint Over a Non-Compatible Paint: For example, applying a latex paint over a high-gloss oil-based paint without proper sanding or priming.
- Failure to Use a Primer: When painting porous surfaces (like new drywall) or making drastic color changes, the wall absorbs the paint binder, leaving the pigment film too weak to adhere.
How to Fix Peeling Wall Paint Problems:
- Identify and Eliminate the Moisture Source: Fix any leaks, improve ventilation, or apply a vapor barrier primer if the issue is high humidity. (Crucial first step!)
- Scrape and Sand: Use a putty knife or scraper to remove all loose, flaking paint. Feather the edges of the remaining paint using medium-grit sandpaper (around 100-150 grit) so the repair blends seamlessly.
- Clean: Wash the entire area with a mild detergent or trisodium phosphate (TSP) solution and rinse thoroughly. Let it dry completely.
- Prime: Apply a high-quality primer/sealer, particularly one designed for problem areas or moisture control, to the bare wall section.
- Repaint: Apply a minimum of two coats of your finish paint.
2. Blistering or Bubbling: A Sign of Trapped Moisture or Heat
Blistering is a frustrating wall paint problem where bubbles or blisters form on the paint surface shortly after application, or sometimes months later. These blisters can vary in size from small pinheads to large dime-sized domes.
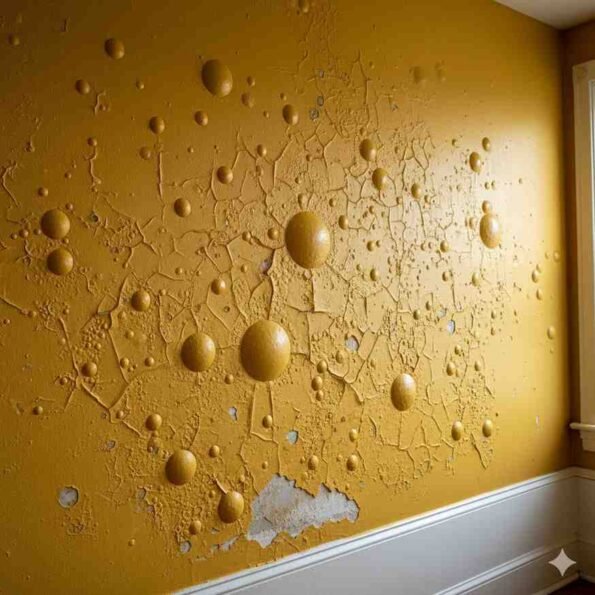
Causes of Blistering:
- Trapped Moisture: Similar to peeling, moisture vapor trying to escape the wall pushes the paint film up into a bubble. This often happens on exterior walls or interior walls where a leak is present.
- Applying Paint in Hot Sunlight: The surface of the wall heats up quickly, causing the solvent or water in the paint to vaporize faster than the paint can dry and adhere. The trapped vapor creates the bubble.
- Painting Over a Dirty or Wet Surface: Residue or moisture on the surface prevents the paint from bonding fully.
How to Fix Blistered Wall Paint Problems:
- Small, Isolated Blisters (No Moisture): If the blisters are few and the paint underneath is adhering well, simply scrape them off, sand the edges smooth, prime the bare area, and repaint.
- Extensive Blistering (Possible Moisture): If blisters cover a large area, the whole section must be removed.
- Remove: Scrape and sand all the bubbled paint.
- Inspect: Check for moisture or contamination. Ensure the wall is absolutely dry.
- Prepare and Repaint: Prime with a vapor-barrier primer and apply new topcoats.
3. Cracking and Crazing: Identifying Surface Tension Wall Paint Problems
Cracking refers to a fracture in the paint film, often resembling dried mud or alligator skin, which is sometimes called “crazing” or “alligatoring.” This type of wall paint problem usually develops over time.
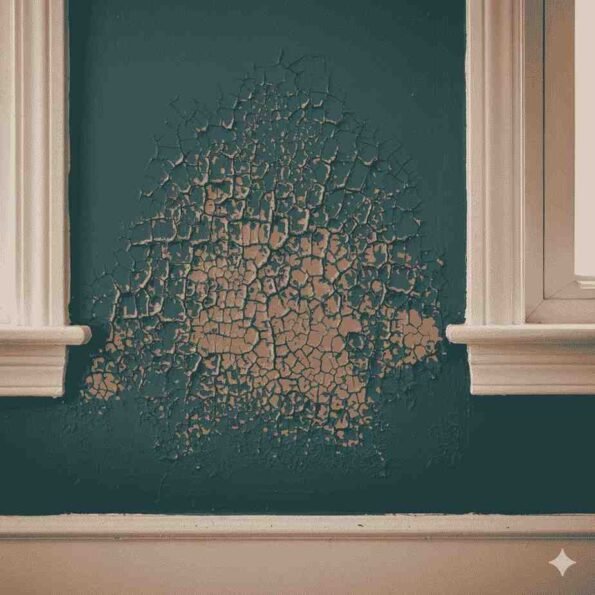
Causes of Cracking and Crazing:
- Age and Inflexibility: As paint ages, it loses its elasticity and cracks due to the natural expansion and contraction of the wall material (wood, drywall, etc.).
- Applying a Harder Paint Over a Softer Undercoat: A rigid, oil-based topcoat applied over a flexible, latex undercoat. As the soft undercoat moves, the hard topcoat cracks.
- Applying a Topcoat Before the Primer is Dry: If the primer or previous coat isn’t fully cured, the topcoat adheres poorly and shrinks unevenly as it dries.
- Paint Applied Too Thickly: Very thick coats of paint, especially alkyd or oil-based ones, can shrink significantly upon drying, leading to surface stress and cracking.
How to Fix Cracking Wall Paint Problems:
- Minor Cracks (Crazing): Lightly sand the entire area to smooth out the surface texture. Clean, prime, and repaint.
- Deep, Severe Cracks (Alligatoring): This requires complete removal of the problem paint.
- Remove: Scrape and sand all cracked paint down to the bare substrate or a sound, well-adhering layer.
- Fill: Repair any deep surface damage (like large cracks in plaster) with patching compound.
- Prepare and Repaint: Apply a flexible, high-quality primer, followed by two topcoats of a modern, more flexible latex paint.
4. Mildew and Mold: More Than Just a Cosmetic Wall Paint Problem
Mildew and mold are not strictly wall paint problems, but rather surface contaminants that thrive on paint. They appear as black, gray, or dark brown patches or spots and are commonly mistaken for dirt or soot. They are prevalent in areas with high humidity and poor light.
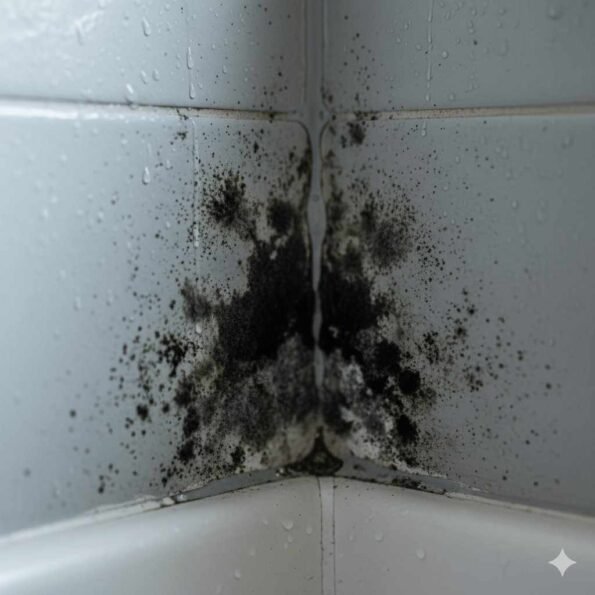
Causes of Mildew and Mold:
- High Humidity and Condensation: Bathrooms, kitchens, laundry rooms, and poorly ventilated areas trap moisture, creating the perfect damp environment for fungal growth.
- Low-Quality Paint or Paint that Lacks Mildewcides: Some paints are formulated with ingredients that mold can feed on. Modern, quality paints often contain mildewcide additives.
- Poor Air Circulation: Stagnant, moist air is the ideal breeding ground.
How to Fix Mildew and Mold Wall Paint Problems:
Safety Note: Wear gloves and eye protection. Do not mix bleach with ammonia-based cleaners, as this creates toxic fumes.
- Clean: Prepare a solution of one part liquid chlorine bleach to three parts water.
- Treat: Apply the solution to the affected area with a sponge, cloth, or spray bottle. Allow the solution to sit for 10-20 minutes to kill the spores.
- Rinse and Scrub: Rinse the area with clean water. Scrub the residue off with a stiff brush or abrasive pad.
- Dry and Ventilate: Ensure the surface is completely dry. Address the root cause by improving ventilation (install an exhaust fan or use a dehumidifier).
- Repaint (Optional but Recommended): Prime with a mold-inhibiting primer, and repaint with a high-quality, mildew-resistant semi-gloss or gloss paint (these are easier to clean and less porous than flat finishes).
5. Visible Brush Marks and Roller Laps: Application-Related Wall Paint Problems
Visible brush marks (often called “roping”) and roller lap marks (where the edge of one roller swath shows up darker or thicker than the next) are application-related wall paint problems that ruin an otherwise smooth finish.
Causes of Brush Marks and Roller Laps:
- Working Too Slowly: Paint dries quickly. If you don’t maintain a “wet edge” while rolling or brushing, the paint starts to set before you blend the next section into it, creating a visible seam or lap mark.
- Using the Wrong Tools: Using a cheap roller cover with short nap on a porous wall, or a stiff, low-quality paintbrush.
- Thinning the Paint Incorrectly: Making the paint too thin causes it to run and drip; making it too thick leaves heavy texture and brush marks.
- Over-Brushing or Over-Rolling: Excessive brushing or rolling back and forth causes the paint film to break down and leaves textural marks.
How to Fix Visible Brush Marks and Roller Laps:
- Light Sanding: Wait until the paint is completely cured (often a week or more). Lightly sand the surface irregularities using a fine-grit sandpaper (220 grit or higher). The goal is not to remove all the paint, but to knock down the raised edges.
- Clean and Prime: Wipe away the sanding dust and apply a thin coat of primer.
- Repaint with Proper Technique:
- Keep a Wet Edge: When rolling, always overlap your previous stroke by about half the roller width while the edge is still wet.
- Use the Right Tools: Use a high-quality synthetic brush for latex paint and a high-quality roller cover with the appropriate nap size for your wall texture.
- Temperature: Paint in comfortable temperatures (ideally 65-75°F) and avoid high humidity, as this can impede drying.
Prevention is the Best Solution for Wall Paint Problems
While knowing how to fix these five major wall paint problems is valuable, the ultimate goal is to prevent them in the first place. A perfect paint job starts long before the brush touches the wall.
Key Preventative Measures:
- Surface Prep is Everything: Spend 80% of your time on preparation. Clean, sand, patch, and fill before you open the first can of paint.
- Always Prime: Use the right primer for the job—a stain-blocking primer, a moisture-barrier primer, or a bonding primer, depending on your wall’s condition.
- Invest in Quality: Use high-quality paint, brushes, and rollers. Premium paints have better binding agents and flexibility, reducing the chance of adhesion wall paint problems.
- Allow for Proper Curing: Always follow the manufacturer’s directions for recoat times. Never rush the drying process, especially between coats.
Conquering Your Wall Paint Problems
Dealing with wall paint problems can be frustrating, but armed with the right knowledge, you can diagnose the issue, execute a lasting fix, and ensure your walls maintain a beautiful, professional finish for years to come. From identifying the tell-tale signs of moisture-related peeling to mastering the rolling technique that eliminates lap marks, addressing these wall paint problems confidently is the mark of a successful DIY project.